When the Sixty-Two is set to control Auto Loops, the Loop Select knob is used to scroll to the desired loop length. From there, pressing the Roll button will activate a Loop Roll of the desired length. Typically, you would use two hands in order to move quickly between the loop lengths. This article will explain how to MIDI map the mixer’s Cue buttons so they have their own loop length. This frees up one of your hands and allows you to trigger any Loop Roll with the press of a button and generate some cool roll effects. Some may refer to this as “Dicer” type Loop Rolls. Let’s begin!
preparing the software
Connect the mixer, go to the Setup screen, and check the “Allow MIDI Assign of Mixer Controls” option within the Hardware tab. Now return to the main screen by clicking the Setup tab again.

understanding midi layers
Layer 1 is always locked to control the software; therefore you will not be able to map anything to Layer 1. Switch to another MIDI layer by holding down the Samples/Cues button on the mixer and at the same time pressing cue 1-5 to jump to that MIDI Layer.
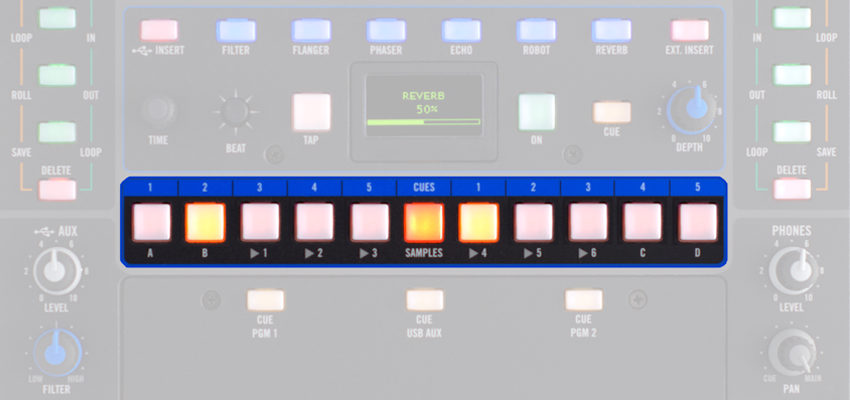
The graphic below shows the Samples/Cues button being held. Doing this will turn all the Cue buttons a milky amber color. The Cue button that is lit in brighter amber is the Layer you are in. The left side of the mixer (PGM 1) is shown to be in Layer 2, while the right hand side (PGM 2) is still on Layer 1. You can now MIDI map a Loop Roll length to each of the 5 cues on the left:

midi mapping
- Click the “MIDI” button at the top of Serato.
- Hold the Control + Alt/Option key on the keyboard (Ctrl+Alt for Windows) and at the same time click on the Auto Loop length in the software (½ for example). Doing this will bring up a brown MIDI panel within the software.

- Press the Cue button on the mixer you would like to map it to (cue 1 for example). The MIDI panel in the software will then turn green when the Cue button is successfully mapped.
- Keep mapping the rest of the Cue buttons to loops to your desired Loop Roll lengths. Once you are done, press the MIDI button at the top of the screen (to exit MIDI map mode), then go into the Setup screen, click “Save As” under the MIDI tab, give it a name, and hit “Enter” on the keyboard.

- Remember to select, and load, your MIDI preset every time you restart the program.
You have successfully mapped Loops Rolls to the Rane Sixty-Two Cue buttons in Layer 2. Congratulations!
For more MIDI in Serato info, check out this quick article at Serato.com: MIDI in Scratch Live 101